Four steps to build Power Apps Code apps from scratch
Power Apps Power Apps Code Apps TypeScript React Power PlatformPower Apps Code (PAC) apps provide a code-first approach to building applications on the Power Platform using TypeScript and React. This is particularly beneficial for developers familiar with modern web development practices who want to leverage the Power Platform’s capabilities.
PAC apps extend the capabilities of the Power Platform by enabling developers to create fully custom-coded applications while utilizing platform features such as connectors and security. Because they extend the known Power Apps representations, they are also considered first-class components of the Power Platform, alongside Canvas and Model-driven apps.
Note
By the time of writing, Power Apps Code apps are still in preview.
As PAC apps run in a node-based environment – allowing for local development and testing before deployment to the Power Platform –, they enable a more traditional development workflow based on coding practices and real collaborative development.
This topic outlines the four essential steps to create your first Power Apps Code app from scratch and shows how to set up the necessary environment and tools. In the first chapter, only the big picture is presented; detailed instructions for each step follow in subsequent sections.
Big Picture: Four Steps to Build Your First Power Apps Code App
Follow these four steps to build your first Power Apps Code app from scratch:
The steps are handed as follows, according to the official documentation on https://learn.microsoft.com/en-us/power-apps/developer/code-apps/how-to/create-an-app-from-scratch:
-
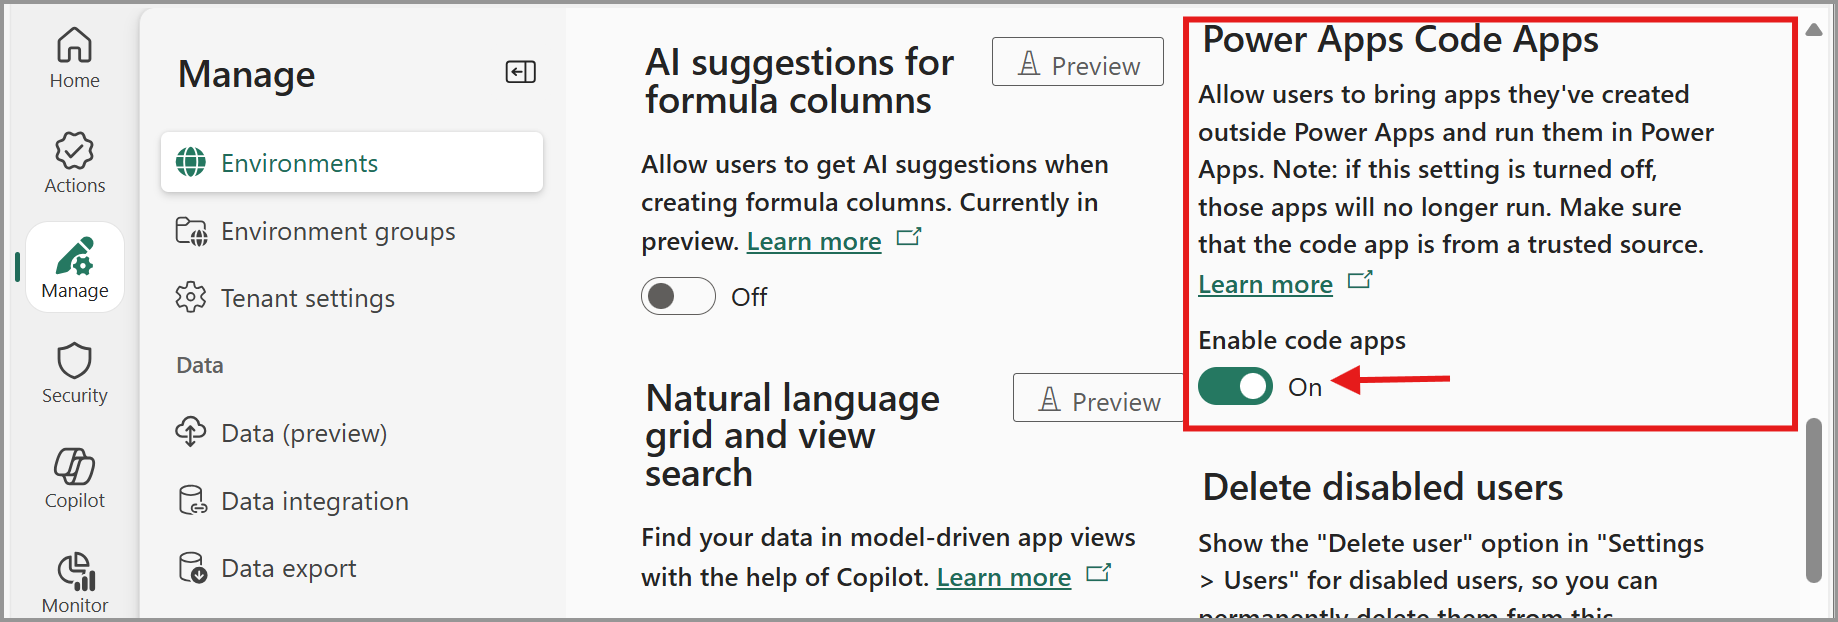
Enable Code Apps in the Power Platform Environment
First, ensure that Code Apps are enabled in your target Power Platform environment. This can be done via the Power Platform admin center by navigating to the environment settings and enabling the Code Apps feature:
-
Set Up development Tools locally
Set up the necessary development tools on your local machine. This typically involves installing Node.js, a code editor like Visual Studio Code, and the Power Platform CLI (Command Line Interface) – or even the Visual Studio Code extension «Power Platform Tools» – to facilitate app creation and deployment:
- Visual Studio Code: 👉 https://code.visualstudio.com/
- NodeJS server (latest): 👉 https://nodejs.org/en
- Microsoft Power Platform CLI (PAC CLI): 👉 https://learn.microsoft.com/en-us/power-platform/developer/cli/introduction
Alternatively, you could install the Power Platform Tools for Visual Studio Code extension, which includes the PAC CLI.
Warning
Users running the «Power Platform Tools for VS Code» extension on Mac OS will receive an error warning referring to Node.js when trying to add a data source to the project and using the PAC CLI. This bug is related to an erroneous node package used in the PAC CLI that comes with the VS Code extension.
To resolve this as a workaround, follow this guidelines: https://gist.github.com/tmaestrini/5eb492c74dee91890df463adbd18e8fb. -
Create the Power Apps Code App From Template
-
Initialize a Power Apps Code app – which is nothing but a Vite application – by cloning an official Vite template provided by Microsoft. This sets up the basic structure of your app (let’s call it
my-code-app), including all necessary configurations and dependencies:npx degit github:microsoft/PowerAppsCodeApps/templates/vite my-code-app cd my-code-app npm install -
Authenticate the Power Platform CLI against your Power Platform tenant, name the connection according to your preference (calling
pac auth createestablishes an interactive authentication session), and select the environment (by its environment ID) where you enabled Code Apps in step ①:pac auth create pac env select --environment <environment ID> -
Now, you’re ready to «transform» your native Vite application into a Power Apps Code app (let’s call it
My App from Scratch) by initializing the project with the PAC CLI:pac code init --displayname "My App from Scratch"
-
-
Run the Application locally and connect it to the Power Platform
-
Finally, run your application locally using the development server provided by Vite:
npm run devThis will start a local development server, typically accessible at
http://localhost:5173/, provided under Local URL based on the following terminal output:> vite@0.0.0 dev > vite Power Apps Vite Plugin ➜ Local Play: https://apps.powerapps.com/play/e/<environment ID>a/local?_localAppUrl=http://localhost:5173/&_localConnectionUrl=http://localhost:5173/__vite_powerapps_plugin__/power.config.json VITE v7.3.0 ready in 665 ms ➜ Local: http://localhost:5173/ ➜ Network: use --host to expose ➜ press h + enter to show help -
You can then connect it to the Power Platform to test its functionality and ensure it interacts correctly with platform boundaries and services, by accessing the provided Local Play URL in your browser (as shown in the terminal output above).
-
Once satisfied, you can build the app and then push (deploy) it to the connected Power Platform environment using these commands:
npm run build || pac code push
-
You’re all set. By following these four steps, you can successfully create and deploy a Power Apps Code app, leveraging the full potential of the Power Platform while adhering to modern development practices.